- Get link
- X
- Other Apps

Mavitro premium blogger template is a paid template in ThemeForest, you can download it here for free. I want to share with you the basic guides of mavitro, on how to set up the template. You can download it for free at the bottom of this post (just scroll down).
How to upload the mavitro template?
(Just follow and read the tutorial carefully)Step 1: You can install the theme by going to the following path: Dashboard > Template > Backup / Restore > choose the "Mavitro.xml" file and click on Import from computer button and save.

Step 2: You can also install your theme by going to the following path: Dashboard > Template > Template HTML click on it and select all using keyboard shortcut Ctrl+A and delete all, then you will go to the "Mavitro.xml" file and open them with an editor software like "Notepad" and select all and come back again to blogger editor and paste all this code and save the template.

Activate Responsive in Mobile Devices
You can Activate the responsive for mobile and tablet and other devices by going to the following path: Dashboard > Template > Settings Button for mobile and click on it.
Template Options
1. Boxed StyleTo Active the boxed style just clicks on edit and type boxed and if you want to get back the wide style just delete " boxed " and click Save.
2. Dark Skin
To Active the dark skin just clicks on edit and type dark and if you want to get back the light skin just delete " dark " and click Save.

To hide the Favourite Category just click on edit and type hide, and if you want to show them back just delete " hide " and click Save.
4. Show favorite Post Image
To active the Favorite Post Image just click on edit and type favorite, and if you want to get back the stander post just delete " favorite " and click Save.
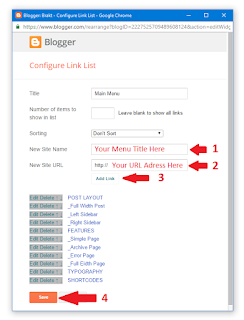
Top Menu Setup
First Go to Dashboard > Layout > Edit Main Menu > Configure Link List On the "New Site Name" field add your menu title and on the "New Site URL" field add your URL address.
Header Social Icons
First Go to Dashboard > Layout > Edit Top Social Media Icons > Configure Link List On the "New Site Name" field add your social name and on the "New Site URL" field add your social URL address.
Social Icons currently supported

Facebook,twitter,gplud, rss, youtube, skype, stumbleupon, tumblr, vine, stack-overflow, linkedin, dribbble, soundcloud, behance, digg, instagram, pinterest, delicious, apple, android.Logo
Go to your dashboard > Your Blog > Layout > Logo and click on Edit, and upload your logo, but do not forget to choose "Instead of title and description" option.Header Advertisement Area
To add you adjust to going to your dashboard > Your Blog > Layout > Top Ad Area and click on Editand put your Advertisement code in the widget.

Go to your dashboard > Your Blog > Layout > Theme Options > Top Menu Widget for Desktop & iPads and click on Edit link, and follow the steps below.
Go to your dashboard > Your Blog > Layout > Breaking News Widget and click on Edit link, just type the "label name" and just follow the steps below.
Just type: label name (ex. Technology)

Go to your dashboard > Your Blog > Layout > Select the section you want and click on Edit Link, and type your "label name''
Just type: label name (ex. News)

For Example

Template Section's Color Go to your dashboard > Your blog > Theme > Customize > Advanced > Select Sections Color and make your own color of each section and after that click Apply to Blog.

Blog Settings
Go to your dashboard > Your blog > Layout > Blog Widget and click on Edit Link, you should follow the steps below.

To show the Author Bio box, First Go to Dashboard > Layout > Edit Blog Posts > and make it looks like the picture below.
Download Now the Template